Virtual Environment with pyenv
Table of Contents
Python is a popular programming language and often times we need to import external libraries to help us perform various tasks. However, Python and those external libraries have many different versions, sometimes one python version may not support the libraries that we need, or some of our projects just require a different version of external libraries than another one. When we only have one python installation in our computer and have only that one place to install our packages, we cannot perform all the tasks that have different version requirements for Python or the packages.
One way to handle this is to create a virtual environment, where the Python (interpreter), libraries and scripts installed into it can be isolated from those installed in other virtual environments. pyenv can help us install different versions of python and easily switch between them; pyenv-virtualenv is a pyenv plugin that provides features to manage virtualenvs (and conda environments) for Python on UNIX-like systems.
Note there are other ways to create virtual environments, this is just one way.
Step 1: Install pyenv and pyenv-virtualenv #
For MacOS users, you can install pyenv (and pyenv-virtualenv) with Homebrew. If you do not have Homebrew on your computer yet, run the following command in your terminal to install Homebrew first (check here for more information).
/bin/bash -c "$(curl -fsSL https://raw.githubusercontent.com/Homebrew/install/HEAD/install.sh)"
After that, install pyenv by running the following commands in your terminal:
brew update
brew install pyenv
install pyenv-virtualenv by running either of the the following 2 commands:
brew install pyenv-virtualenv
brew install --HEAD pyenv-virtualenv # install the latest development version
Step 2: Set up shell environment for Pyenv #
Depends on your shell type, you need set up the shell environment differently. To check what shell type you have on your computer, open your terminal and it will show up on the top part of the terminal window. The following setup should work for the majority of users for common use cases(see below).

- For Zsh
echo 'export PYENV_ROOT="$HOME/.pyenv"' >> ~/.zshrc
echo 'command -v pyenv >/dev/null || export PATH="$PYENV_ROOT/bin:$PATH"' >> ~/.zshrc
echo 'eval "$(pyenv init -)"' >> ~/.zshrc
- For bash:
# add the commands to ~/.bashrc
echo 'export PYENV_ROOT="$HOME/.pyenv"' >> ~/.bashrc
echo 'command -v pyenv >/dev/null || export PATH="$PYENV_ROOT/bin:$PATH"' >> ~/.bashrc
echo 'eval "$(pyenv init -)"' >> ~/.bashrc

# add the commands to ~/.profile
echo 'export PYENV_ROOT="$HOME/.pyenv"' >> ~/.profile
echo 'command -v pyenv >/dev/null || export PATH="$PYENV_ROOT/bin:$PATH"' >> ~/.profile
echo 'eval "$(pyenv init -)"' >> ~/.profile

# add the commands to ~/.bash_profile
echo 'export PYENV_ROOT="$HOME/.pyenv"' >> ~/.bash_profile
echo 'command -v pyenv >/dev/null || export PATH="$PYENV_ROOT/bin:$PATH"' >> ~/.bash_profile
echo 'eval "$(pyenv init -)"' >> ~/.bash_profile
In order to make pyenv-virtualenv work, you need to further add the following:
eval "$(pyenv virtualenv-init -)"
After the shell setup steps, remember to restart the shell for the changes to take effect by running
exec "$SHELL"
Step 3: Use pyenv and pyenv-virtualenv #
1. pyenv usage #
Before installing any new python version with pyenv, first install Python build dependencies following the instructions here under Suggested build environment session.
By simply typing pyenv in the terminal, you will get a preview of some useful pyenv commands there. The following are some common commands.
Install/uninstall additional python version
pyenv install <version> # install e.g. pyenv install 3.7.14
pyenv uninstall <version> # uninstall
You can check all the available versions by running the following command:
pyenv install --list | grep " 3\.[67891]"
# This will list all the available python versions of 3.6 above
Check Python versions installed under pyenv
the one with the * in front is the global/default python version. Note that if you have conda installed, the python version under conda environment will not show here.
pyenv versions

Switch versions/deactivate pyenv
pyenv shell <version>  # select version for current shell session
pyenv local <version>  # Set default version for the current directory (or its subdirectories)
pyenv global <version> # set global version for user account
pyenv shell --unset    # deactivate pyenv
2. pyenv-virtualenv usage #
Create a virtual environment with specific python version
pyenv virtualenv <python_version> <venv_example>
# e.g. pyenv virtualenv 3.10.4 venv_test
Install packages in the created virual environment
pyenv local <venv_example> # first go to the virtual environment
pip install <package>      # install packages using pip install
Use the virtual environment
There are multiple ways to use the virtual environment.
-
If you want to automatically activate the virtual environment for a project folder, you can either
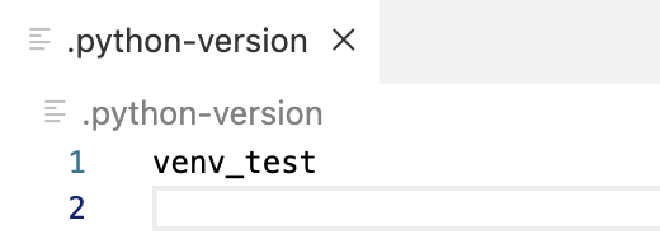
- create a .python-version file in the project folder by running the following command in the terminal:
echo <venv_example> > <project_folder_path>/.python-version
# e.g. echo venv_test > '/Users/yanhe/Desktop/test-env'/.python-version
or
- go to the project from a terminal, and run:
pyenv local <venv_example>
Then everytime you enter the project folder, the virtual environment will be automatically activated, and your codes under that project folder will automatically run via the virtual environment.
- create a .python-version file in the project folder by running the following command in the terminal:
-
If you want to (permanently) change the (default) virtual environment for the project folder, you can achieve that by running:
pyenv local <new_venv>Note that
- if you use the virual environment by creating the .python-version file, you will notice that the .python-version file also changes automatically whenever you change the default virtual environment, it always corresponds to the name of the virtual environment that you set.

- You need to re-enter the project folder everytime after you run pyenv local
in order to make the new virtual environment take effect.
You can always check the (default/permenant) virtual environment for your project folder by opening a terminal under that folder and running:
pyenv local -
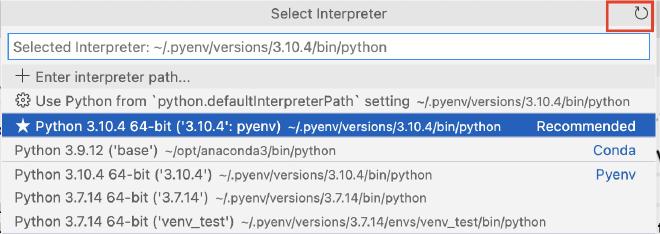
If you are working in VS Code you can activate a virtual environment by pressing control+shift+P and select Python: Select Interpreter, refresh by clicking the refreshing bar on the top right (this should give you all available choices in your computer) and choose the virtual environment that you want, this will not change the default virtual environment.

-
If you want to temporarily switch to a different virtual environment in current terminal, you can open a terminal and run the following command:
pyenv shell <new_venv>
Collaborating with others #
The best part about working with virtual environments is how easy it becomes to work with others on projects. All you need to do is let them know what python version your using and give them a snapshot of your environment using pip freeze > requriements.txt. Now they are able to recreate your environment on their laptop without changing their global settings.
It is good practice to have a base environment as your starting shell and then create a new environment for each project you work on.
Have fun with your Python virtual environments :)
Some other useful links:
https://github.com/pyenv/pyenv#set-up-your-shell-environment-for-pyenv
